DARwIn-OP Received in our Office - Teardown Revew
DARwIn-OP Received in our Office - Teardown Revew
![]() by nunogato
by nunogato
Fri Aug 12, 2011 4:38 pm
We received our DARwIn-OP at our office and for now, we only had time get it to do its out-of-the-box football following tricks.
<object width="600" height="450"> <param name="flashvars" value="offsite=true&lang=en-us&page_show_url=%2Fphotos%2Frobosavvy%2Fsets%2F72157627291850427%2Fshow%2F&page_show_back_url=%2Fphotos%2Frobosavvy%2Fsets%2F72157627291850427%2F&set_id=72157627291850427&jump_to="></param> <param name="movie" value="http://www.flickr.com/apps/slideshow/show.swf?v=104087"></param> <param name="allowFullScreen" value="true"></param><embed type="application/x-shockwave-flash" src="http://www.flickr.com/apps/slideshow/show.swf?v=104087" allowFullScreen="true" flashvars="offsite=true&lang=en-us&page_show_url=%2Fphotos%2Frobosavvy%2Fsets%2F72157627291850427%2Fshow%2F&page_show_back_url=%2Fphotos%2Frobosavvy%2Fsets%2F72157627291850427%2F&set_id=72157627291850427&jump_to=" width="600" height="450"></embed></object>
Darwin-OP comes in an air-tight carrier. It is waterproof (useful in case your plane has an emergency water landing) but with waterproof air pressure equalizer (so that the bag doesn't implode when the plane cabin de-pressurizes to 8000ft at cruising altitude).


![]() by PedroR
by PedroR
Tue Aug 30, 2011 5:17 pm
We've been test driving DARwIn for the past couple of weeks and wanted to share an update with you.
Due to the Holiday period we were a bit shorthanded and were unable to make a comprehensive coverage of our testing. We'll try to make up for it now
First off, here are a few key pictures of the process of un-boxing:
100_2019 by RoboSavvy, on Flickr
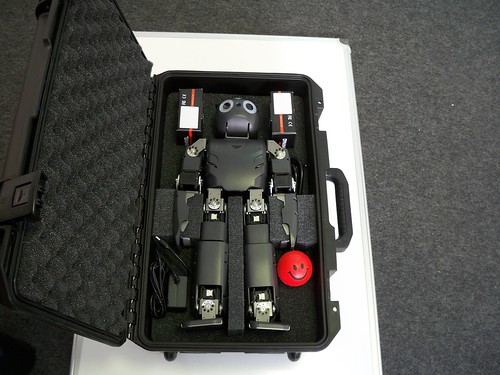
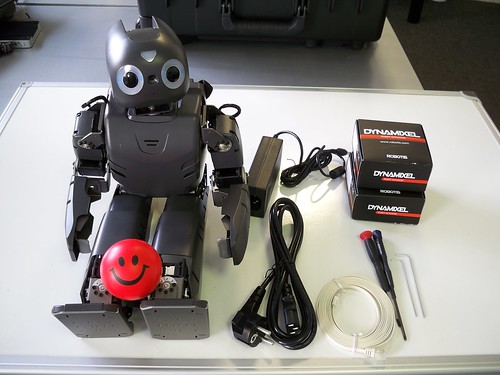
This is the Deluxe Edition so it includes the CM2500 case which is water proof, shock proof, and I guess it's just not Nuclear proof
The Dynamixel boxes you see don't actually carry servos; they have a number of accessories inside:
- 3x 100mAh LiPo batteries (these are the same used in the PREMIUM kit) but with a different connector.
- LiPo Charger
- Fuses
- Cables
- Misc Nuts and Bolts + Loctite 248 glue (the same glue that comes with the Bioloid GP)
- USB Thumb Drive with Software to restore DARwIn to factory default install.
The box also includes a ribbon shaped Ethernet cable (to connect to the FitPC2) and the usual 12V SMPS Robotis Power supply.
100_2022 by RoboSavvy, on Flickr
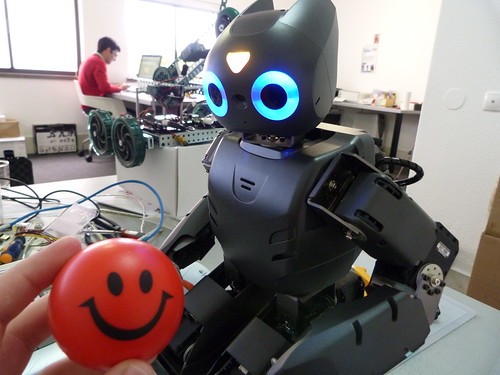
I forgot to mention the Red ball which is one of the most amusing parts of the kit when you turn it on, right out of the box: the little guy will actually play soccer with you; it will chase the ball down and kick it (in a random direction but it will kick it!).
Also notice the ribbon type Ethernet cable in the front; I had never seen one with this shape but it works though
100_2025 by RoboSavvy, on Flickr
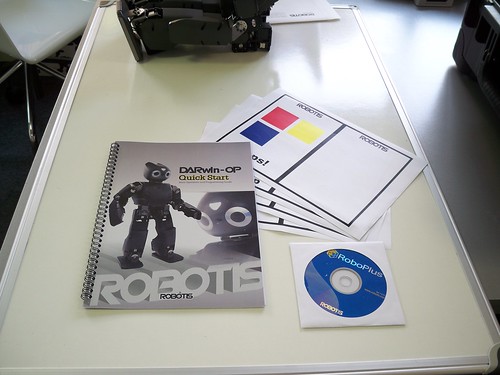
A small User Manual, along with some colored sheets, are also included. The colored sheets are used to run one of the many demos that are pre loaded. It is simultaneously funny and a bit spooky to be flashing the cards in front of DARwIn; it's funny because you can see it react to the colours and spooky because it reminds you of strange psychological tests (DARwIn is in good health btw and gets things right
Looking at DARwIn:
100_2037 by RoboSavvy, on Flickr
The Head is built with a Pan & Tilt mechanism; one servo is inside the head and the other is in the chest.
The small triangle between the eyes is a status indicator about the Boot status of the FitPC2: when you turn DARwIn on it is Green meaning FitPC2 is booting; once the PC is ready the light turns orange/yellowish meaning it's ready to run.
It's a new concept having to wait for a Robot to boot but for fairness sake, it boots fairly fast (and runs Ubuntu btw).
The head also has some extensions on the side that look like cat ears, especially when it's looking down. We can anticipate there may be some mixed opinions about this one.
100_2030 by RoboSavvy, on Flickr
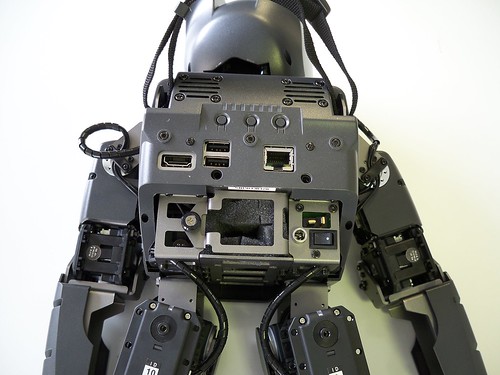
On the back you can see the tech bits and the more interesting parts.
- The three buttons on top belong to the CM730 but in practice they let you select the demo program you want to run, start it and reset the running program; it is very much inspired by Bioloid.
- Bellow you can find the HDMI connector, 2 USB ports and the Ethernet connector.
The small hole bellow the USB ports (and the one to the right as well) are connectors for Line In and Line out (jack connectors) in case you want to use external sound devices.
Do note that DARwIn comes with WiFi but you'll need to login in via Ethernet if you want to set up the initial WiFi connection to your Home network for example.
- Finally you have the location for the battery, the battery connector, the power button and the connector for the SMPS (power supply from the wall socket)
You can see how much different the battery connector is, compared to Bioloid.
Another interesting thing is that the foaming inside the battery housing is supposed to stay there: the battery that comes with DARwIn is the same that comes with the PREMIUM kit and it's much smaller than the battery housing; therefore you need the foam to keep it in place.
Using a 1000mAh LiPo on DARwIn is - honestly - silly.
This looks more like a decision related to the supply chain than an engineering one.
Gladly the battery housing has more than enough space to house a much larger and higher capacity battery (we risk saying you'd be able to house a battery with twice the capacity (2000 mAh) there).
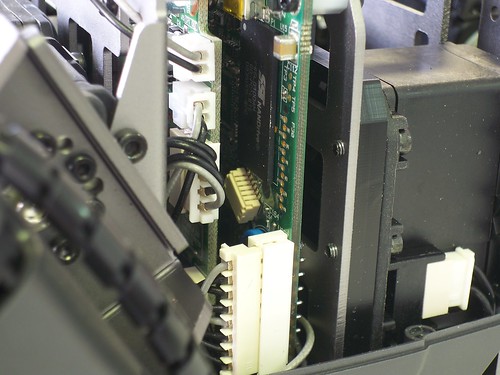
Taking it apart:
100_2044 by RoboSavvy, on Flickr
We first removed 4 screws in the back to release the Chest part.
100_2045 by RoboSavvy, on Flickr
This is how the Chest of DARwIn looks (we recommend you can click on the picture to enlarge it and get a better view).
The Speaker is built into the front of the chest. We must say the sound quality is OK but for such expensive equipment Robotis could have gone with a better speaker.
On the lower side you can see the FitPC2. From the picture you can see the original FitPC2 case has been stripped out and only the PCB is assembled inside.
This side exposes 2 USB OTG ports, an SD card connector and the button on the right which looks like the Power button.
The Chest of DARwIn has a little mechanism that lets you press this button with the chest closed; you're supposed to press the button 3 times to initiate a shutdown of the Linux system and only once that’s complete you can/should turn off the power.
We didn't really figure out yet what the 3 buttons above the SD card slot are for.
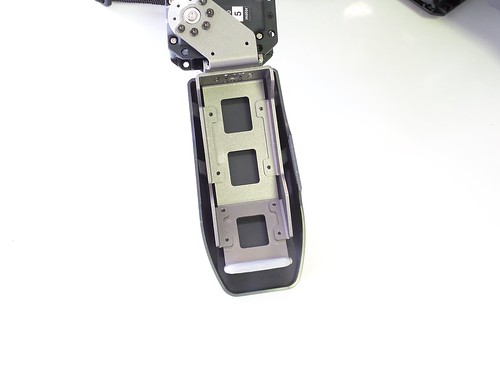
Here is a close up:

100_2050 by RoboSavvy, on Flickr
100_2051 by RoboSavvy, on Flickr
From the side you can see how the FitPC2 and CM730 boards are stacked. This is a very clever design and if you have access to downloading the 3D files of DARwIn (from sourceforge) you can get a better idea of how everything was thought out.
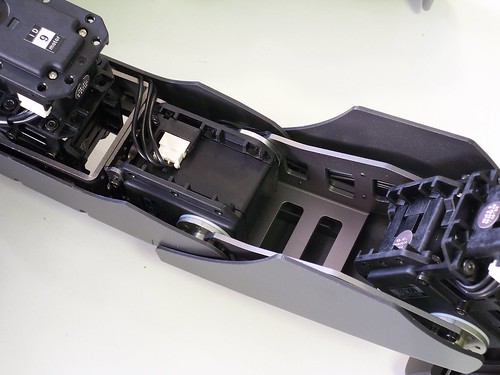
100_2052 by RoboSavvy, on Flickr
Here is another angle.
We weren't brave enough to take the whole thing apart just yet (we were intimidated by the price tag
Mechanical Design:
At first look we must say the DARwIn Metal frames resemble a super sized Bioloid GP.
However, upon closer look you can see there are some differences, especially in the leg arrangement.
100_2036 by RoboSavvy, on Flickr
The Hand part is quite similar to the GP, only larger;
100_2038 by RoboSavvy, on Flickr
You can see the way the knee is arranged is very different from the GP.
100_2040 by RoboSavvy, on Flickr
The solution for the feet is inspired in the typical Robotis solution but this one works a little better due to the improvements on the MX 28 servos:
on Bioloid Comprehensive, Premium and GP there is always some loose spot on the ankles; when the robot is standing if you push it forward or backward it always tilts a bit.
It happens on DARwIn too, but on DARwIn it is capable of correcting even the slightest deviation from the upright position. You push it forward a bit and it gently goes back to its designated position.
This is likely due to the use of the Magnetic encoder and the higher position resolution (0-4096).
It's a small thing but you can really see the attention to detail and all these improvements with the MX-28s at work.
100_2041 by RoboSavvy, on Flickr
Finally, the Hip / Knee arrangement.
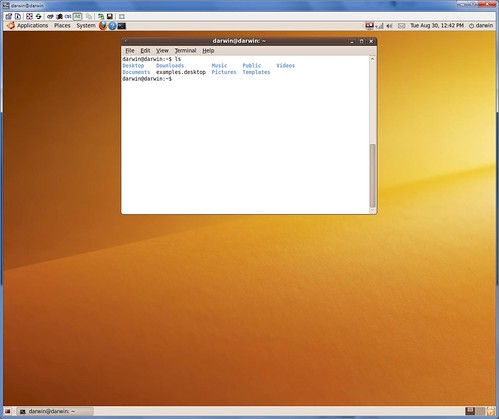
Linux Environment:
DARwIn comes pre loaded with Ubuntu Linux and by default loads XWindow (Gnome) system and VNC.
This means you can work on DARwIn itself with the full comfort of a (Remote) Desktop environment (VNC).
If you prefer, there is also SSH shell access for the brave ones
DARwIn-OP Desktop by RoboSavvy, on Flickr
DARwIn-OP default installed software by RoboSavvy, on Flickr
The only thing required to access DARwIn is either the Ethernet connection or WiFi.
Do note that for setting up the WiFi you need to initially connect to DARwin via Ethernet:
- The Ethernet cable should connect directly from DARwIn to your computer.
DARwIn runs a DHCP server and will assign an IP to your computer (by looking at the assigned Gateway you'll find the IP of DARwIn).
- Once you do that, open up the VNC client, connect to the graphical environment and use the Graphical tools to set it up to connect to your wireless home network.
I hope this post covers a lot of the questions we all had about DARwIn. We're planning more posts to cover some more of the work we've done with DARwIn.
We look forward to hear your comments!
Regards
Pedro.
![]() by PedroR
by PedroR
Tue Aug 30, 2011 5:43 pm
One of the things that intrigues a DARwIn owner after running the pre loaded samples is: now what?
First off, you need to connect to it over Ethernet and set up the WiFi connection.
With that you can either access DARwIn via VNC (Ubuntu graphical environment) or via SSH (console).
DARwIn-OP default installed software by RoboSavvy, on Flickr
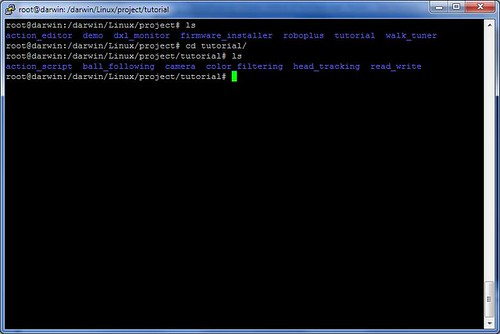
You'll find that DARwIn comes with a set of Tutorials and samples that are ready to compile.
Our first attempt was ball (BLOB) tracking using the Pan & Tilt mechanism of the head.
Build the sample and run it.
One interesting bit is that when DARwIn is running Vision recognition, you can follow what he's "seeing" by visiting http://yourdarwinip:8080There you'll find a sream of what DARwIn is seeing and the regions he's recognizing.
You can also adjust the camera settings on the fly (and see the results of the adjustments in real time).
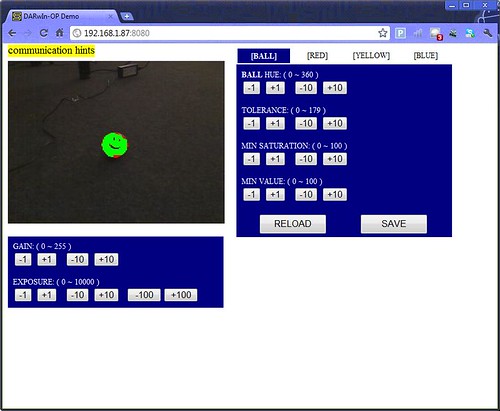
DARwIn-OP Demo Page by RoboSavvy, on Flickr
In our case we had to adjust the exposure because DARwIn was not recognizing Dark Blue regions (not needed for this sample code but needed for other which we'll be posting)
This is very, very nice and great improvement over solutions that require pre calibration such as HaViMo (where you have to re calibrate every time light conditions change).
Bellow is a video of DARwIn running the Vision recognition sample (he tracks the ball using the pan & Tilt mechanism).
DARwIn-OP looking at the ball by RoboSavvy, on Flickr
Pedro
![]() by PedroR
by PedroR
Wed Aug 31, 2011 11:46 am
Here we are again, this time with some Videos of the default demo that ships with DARwIn-OP.
Btw the default demo is actually a process that is started upon boot called "demo" which can kill and replace with your own program for DARwIn-OP (which you can easily create from the Tuturials and the DARwIn framework).
The source code of this Demo program is also included so you get a pretty solid set of code to get started with.
Here is soccer mode:
What is does is chase the Red ball position itself in front of it and kick it. (it _never_ missed a kick btw but in the video you can see it gets distracted by other red things we have around the office when it looses sight of the ball).
This is Presentation mode (you have probably seen this one before):
This is Vision Processing mode:
(my second favorite after soccer and very cool)
The different cards have different colour combinations. Depending on the combination DARwIn reacts differently.
It is an interesting demo of detecting multiple BLOBs of different colours, an exercise used in Robocup autonomous soccer competitions for example.
One interesting thing is that for this sample to work, we had to adjust the camera settings on the fly (using the trick we mentioned on the previous post):
- We opened http://ourdarwinip:8080 over WiFi and adjusted the exposure by -400 in real time as it was not recognizing the Dark blue regions.
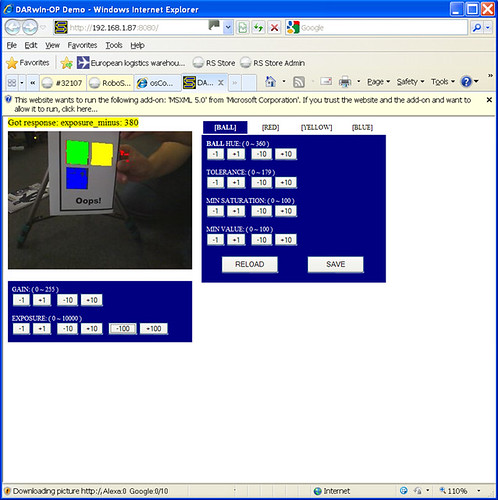
Adjusting DARwIn Camera Exposure on the Fly by RoboSavvy, on Flickr
This is really really nice and it's a large number of these little, well thought things that make up DARwIn. (and not just a bunch of parts bolted together)
Next we'll be posting the Teardown of the DARwIn-OP head.
Regards
Pedro
![]() by PedroR
by PedroR
Wed Aug 31, 2011 12:51 pm
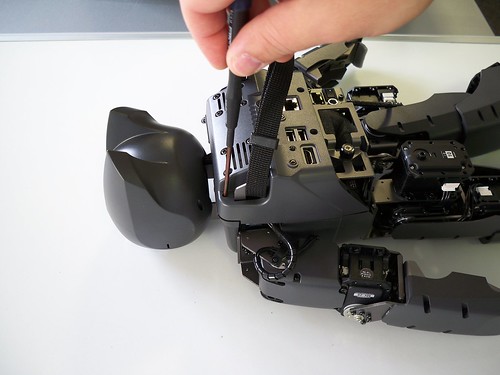
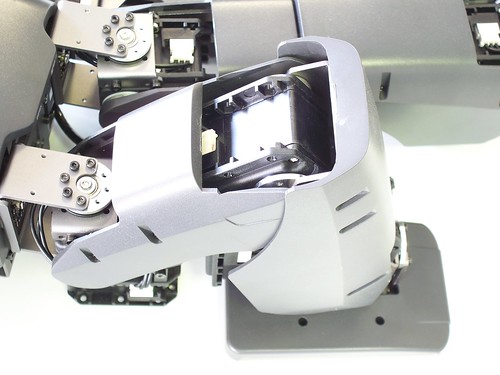
This time, we'll be posting the teardown of the head of DARwIn-OP.
The DARwIn head hasn't really been a point of great interest in past discussions but it is one very clever piece of engineering and conceals more than one might anticipate.
To take it apart, you remove the usual 4 screws (using the well known Robotis screwdriver
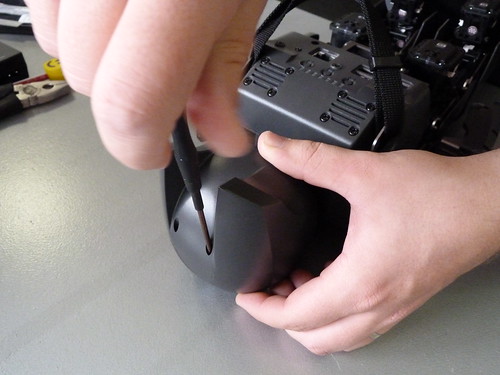
Opening DARwIn-OP Head by RoboSavvy, on Flickr
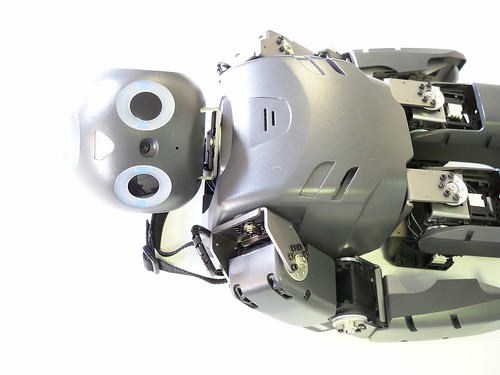
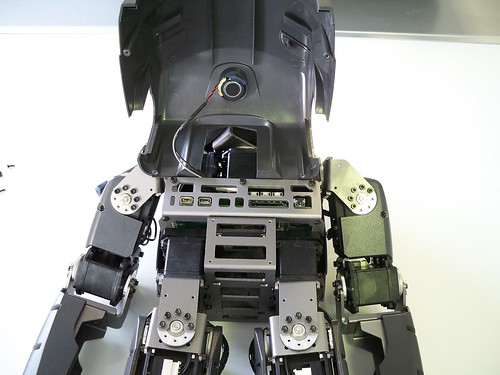
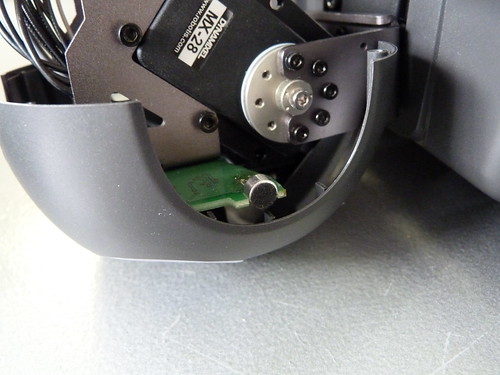
You can see one of the servos of the Pan & Tilt Mechanism is assembled inside the head.
We must say the head is a bit large; it is able to conceal a servo the size of the RX series (definitely larger than an AX servo) and still has plenty of room around it).
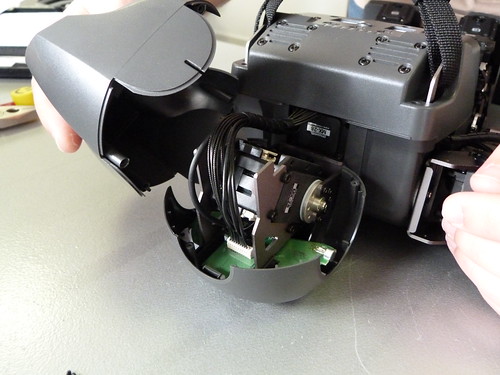
Inside DARwIn-OP head by RoboSavvy, on Flickr
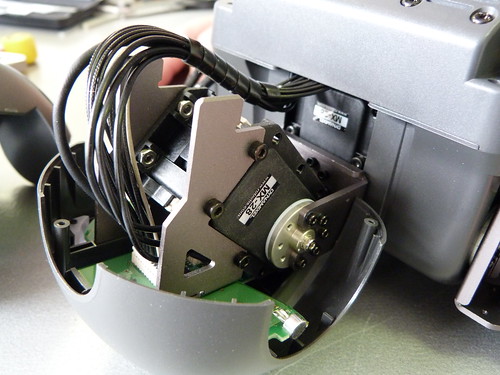
Inside DARwIn-OP head by RoboSavvy, on Flickr
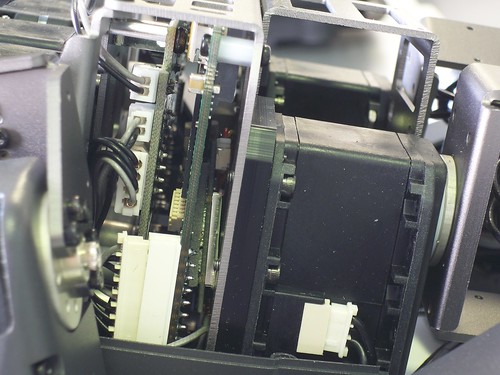
There are 2 boards inside the head:
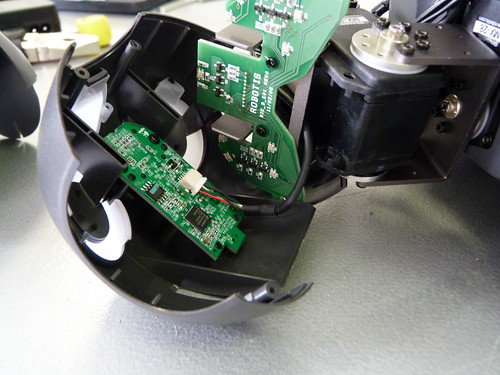
DARwIn-OP Head Camera and LED board by RoboSavvy, on Flickr
The board on the left is the webcam. It seems the same approach taken with FitPC2: Robotis has stripped the casing and assembled the PCB directly on the Robot.
The larger board on the right is designed by Robotis and includes the LEDs for the Eyes (RGB) and the LED for the triangle on the forehead (also RGB).
This board also includes 2 Stereo Microphones (one on each side of the head. See pic bellow).
DARwIn-OP Head microphone detail by RoboSavvy, on Flickr
Here you can see one of the Microphones on the side of the head. <strike>We're not completely sure if connects to the FitPC2 or the CM730 but since there are 2 (one on each side) it makes sense to be offering stereo input to the FitPC2.</strike>
The Microphones are attached to the Robotis board.
[UPDATE Dec 20th 2011] The Microphones in this board are connected to the CM730 board (to analog channels on that board). You can check the Sound Levels on the PC by continuously reading the Analog Channels on the CM-730 (using the Serial Protocol)[/UPDATE]
Next, there is the Webcam PCB:
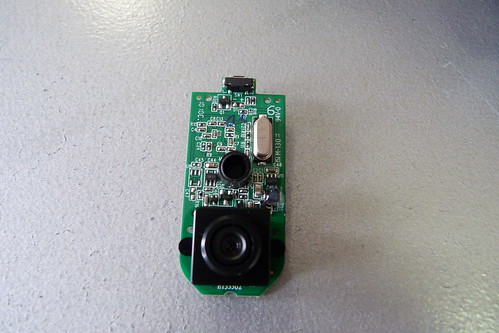
DARwIn-OP Head Camera Front by RoboSavvy, on Flickr
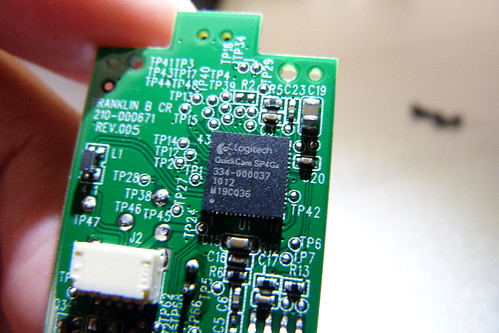
DARwIn-OP Head Camera chip detail by RoboSavvy, on Flickr
The Webcam also has its own Microphone, so we've seen 3 Microphones in the head. The one on webcam is definitely usable by Linux.
(FYI in addition there are also 2 connectors for Line In and Speaker on the back of the robot if you want to use yet another set of speakers or microphone...)
As you can see from the pic the webcam model seems to be a Logitech Quickcam with an SP4GX chip.
[UPDATE Dec 20th 2011]The exact Webcam model is Logitech C905 and seems like a very nice webcam: it includes Carl Zeiss lens and has the following specs:
- Carl Zeiss® optics with autofocus
- Native 2MP HD sensor
- HD video capture (up to 1600x1200@10fps, 1280x720@30fps)
- 720p widescreen mode with recommended system
- Up to 8-megapixel photos (enhanced from native 2MP sensor)
- Microphone with Logitech® RightSound™ technology
- Hi-Speed USB 2.0 certified
- Output : MJPG, YUYV
Details here http://darwin-op.springnote.com/pages/7331901
[/UPDATE]
To complete the teardown, a close up picture of the Head:
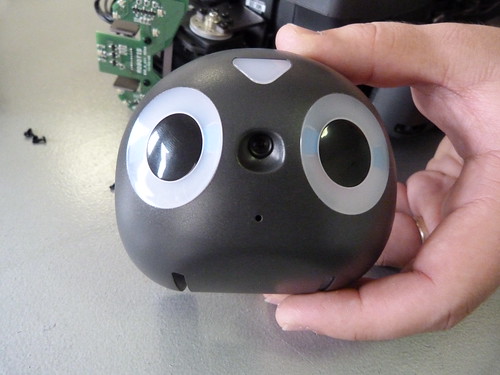
DARwIn-OP Head by RoboSavvy, on Flickr
You can see the Webcam lens between the eyes and also the small hole for the webcam Microphone on the lower center side.
We look forward for your comments and thoughts.
Pedro

![]() by nunogato
by nunogato
Thu Oct 27, 2011 10:07 am
Development of Open Humanoid Platform DARwIn-OP
Gait Pattern Generation and Stabilization for Humanoid Robot Based on Coupled Oscillators
![]() by i-Bot
by i-Bot
Thu Oct 27, 2011 11:09 pm
http://darwin-op.springnote.com/pages/6861909
and the code here:
http://sourceforge.net/projects/darwinop/develop
However the proven success of DARwin-OP in Robocup depends on far more advanced software. The software from University of Pennsylvania make significant leaps forward, but still shared as open source (after big wins !). For this software look here:
http://www.robotsource.org/xe/
and:
https://fling.seas.upenn.edu/~robocup/wiki/index.php?n=Main.Code
You need to get up to speed on Lua, but awesome that this is so accesible to all.
![]() by PedroR
by PedroR
Fri Oct 28, 2011 10:34 am
Following up to Nuno's post yesterday with the papers from a Japanese University, Nuno and Limor tracked down the source code for CM 730 and it appears the firmware code has Japanese comments on it (according to Limor as I can't really tell the difference between Japanese and Korean).
The papers from the Japanese University also cover a lot of what DARwIn is (such as the "Walking Machine"/Dynamic Gait generator) so it seems DARwIn is also a result of a large contribution from this Japanese University (and not only Virginia tech) although it's Virginia Tech who's under the spotlight.
There's no denying that Virginia Tech's work on Robocup was excellent and I trust the results they achieved are really their own merit but I'm left wondering if we're getting all the story of how DARwIn was developed and who contributed to it.
The other thing is Bioloid GP: it looks like a preliminary attempt at DARwIn: although there are some differences in the mechanical arrangement, if you look at how the frames are built (in addition to the comments found on the code mentioned "AX-18") I have a feeling that the GP was their first attempt at DARwIn:
- The head part s designed to accomodate a servo for Pan (just like DARwIn)
- The chest has a layered, "sandwich-type" structure again just like DARwIn (which is what let's DARwIn hold the FitPC2, CM730 and all the buttons, etc in the chest part)
- The mechanical arrangement and look of the frames is quite similar (apart from the legs and hip missing 2 DoF that may have been stripped deliberately to be able to perform all the cool looking gaits such as the cartwheel)
We really like the GP but it's a pity that it lacks 2 DoF in the hip.
When you strip it from the Demo motions and change the basic posture (that reminds me of a chicken ready to flap its wings...) and have it standing straight it's really a very, very nice robot.
It's just a pity that the price tag is set so high and the feature list doesn't really add too much over the PREMIUM (ie same controller, same battery; only a partial number of faster servos and metal frames).
Pedro.
![]() by siempre.aprendiendo
by siempre.aprendiendo
Fri Oct 28, 2011 12:13 pm
I fully agree, it's a very high price tag. Specially compared to the Nao developer program

![]() by i-Bot
by i-Bot
Fri Oct 28, 2011 1:52 pm
I am still using AX12, and am not seeing an easy way to move to AX18 in legs. Is a pack of 6 likely similar to the AX12 ?
I have prototyped an AX-S730, which has all the functions of the CM-730, except the Force sensing and microphone. This is working with the USB2AX from Xevel and the DARwin software. The robot is a humanoid A configuration, but with 20 DOF to include head pan tilt. The AX-S730 can be made much smaller and more appropriate to the AX based robot and small linux contollers where the boards are usually vertical not horizontal.
![]() by PedroR
by PedroR
Mon Oct 31, 2011 2:32 pm
I've checked the Robotis Pricelist and - in the version we have - there is no Pack of 6x AX-18A.
However I trust this should be released soon as these packs exist for other models of servos (6x AX-12, 6x RX-28, 6x RX-64).
I will email Robotis about this and let you know.
Regards
Pedro.
![]() by PedroR
by PedroR
Mon Oct 31, 2011 2:35 pm
I stand corrected: the pack of 6x AX-18A is already available on Robotis store http://www.robotis-shop-en.com/shop/ste ... number=928
I've emailed Robotis to try and find out what's the EU pricing for these packs.
I will let you know as soon as I have that.
Regards
Pedro.