RoboSavvy @ Gadget Show LIVE 2012
RoboSavvy @ Gadget Show LIVE 2012
![]() by PedroR
by PedroR
Mon Apr 09, 2012 5:51 pm
Hi all
RoboSavvy will be presenting some robots at the Gadget show live 2012 in Birmingham (stand D292).
In addition we will be performing a robot dance on stage together with the Gadget show presenters.
If you're visiting the Gadget Show LIVE event don't miss RoboSavvy's stand D292 where we'll be showcasing our coolest gadgets:
- The Replicator 3D Printer with Dualstrusion
- NAO Humanid Robot
- We've also got a number of other Humanoids: several Robobuilders, a Bioloid PREMIUM
- Two Bioloid GPs are reserved for the feature at the Gadget Show Super LIVE Theatre
The other part you should not miss is the show at the Super LIVE Theatre:
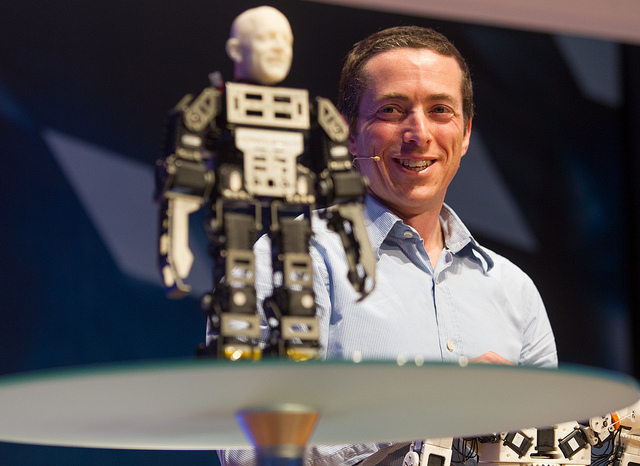
RoboSavvy has prepared a Robot Dance with a heavily customized Bioloid GP to dance to LMFAO's "I'm Sexy and I know it" with Jason and Pollyana.
(fyi the GP has been customized with Torso movement, head Pan and a Custm 3D Printed head of Jason)
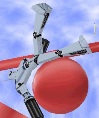
The Robot will be dancing on top of an Acrylic cube with RGB lighting which looks way cool.
It's worth coming by to check it out
Bellow is the gallery with pictures of the Construction of the different features (from building the cube to 3D Printing Jason's head and assembling on the Bioloid GP) and the final packing and preparation before heading off to the Show.:
<object width="400" height="300"> <param name="flashvars" value="offsite=true&lang=en-us&page_show_url=%2Fphotos%2Frobosavvy%2Fsets%2F72157629325817176%2Fshow%2F&page_show_back_url=%2Fphotos%2Frobosavvy%2Fsets%2F72157629325817176%2F&set_id=72157629325817176&jump_to="></param> <param name="movie" value="http://www.flickr.com/apps/slideshow/show.swf?v=109615"></param> <param name="allowFullScreen" value="true"></param><embed type="application/x-shockwave-flash" src="http://www.flickr.com/apps/slideshow/show.swf?v=109615" allowFullScreen="true" flashvars="offsite=true&lang=en-us&page_show_url=%2Fphotos%2Frobosavvy%2Fsets%2F72157629325817176%2Fshow%2F&page_show_back_url=%2Fphotos%2Frobosavvy%2Fsets%2F72157629325817176%2F&set_id=72157629325817176&jump_to=" width="400" height="300"></embed></object>
<strike>We've also got a few spare tickets if anyone's interested (they're really a few).
Send an email to pedro@robosavvy.com in case you're interested in getting one (they'll be given out in a First Come, First served basis).</strike>
[EDIT]We've given out all of the tickets for the show.
Still, you're all welcome to come and visit us. We'll be happy to receive you![/EDIT]
We look forward to seeing you at GSL.
Regards
Pedro.
RoboSavvy will be presenting some robots at the Gadget show live 2012 in Birmingham (stand D292).
In addition we will be performing a robot dance on stage together with the Gadget show presenters.
If you're visiting the Gadget Show LIVE event don't miss RoboSavvy's stand D292 where we'll be showcasing our coolest gadgets:
- The Replicator 3D Printer with Dualstrusion
- NAO Humanid Robot
- We've also got a number of other Humanoids: several Robobuilders, a Bioloid PREMIUM
- Two Bioloid GPs are reserved for the feature at the Gadget Show Super LIVE Theatre
The other part you should not miss is the show at the Super LIVE Theatre:
RoboSavvy has prepared a Robot Dance with a heavily customized Bioloid GP to dance to LMFAO's "I'm Sexy and I know it" with Jason and Pollyana.
(fyi the GP has been customized with Torso movement, head Pan and a Custm 3D Printed head of Jason)
The Robot will be dancing on top of an Acrylic cube with RGB lighting which looks way cool.
It's worth coming by to check it out
Bellow is the gallery with pictures of the Construction of the different features (from building the cube to 3D Printing Jason's head and assembling on the Bioloid GP) and the final packing and preparation before heading off to the Show.:
<object width="400" height="300"> <param name="flashvars" value="offsite=true&lang=en-us&page_show_url=%2Fphotos%2Frobosavvy%2Fsets%2F72157629325817176%2Fshow%2F&page_show_back_url=%2Fphotos%2Frobosavvy%2Fsets%2F72157629325817176%2F&set_id=72157629325817176&jump_to="></param> <param name="movie" value="http://www.flickr.com/apps/slideshow/show.swf?v=109615"></param> <param name="allowFullScreen" value="true"></param><embed type="application/x-shockwave-flash" src="http://www.flickr.com/apps/slideshow/show.swf?v=109615" allowFullScreen="true" flashvars="offsite=true&lang=en-us&page_show_url=%2Fphotos%2Frobosavvy%2Fsets%2F72157629325817176%2Fshow%2F&page_show_back_url=%2Fphotos%2Frobosavvy%2Fsets%2F72157629325817176%2F&set_id=72157629325817176&jump_to=" width="400" height="300"></embed></object>
<strike>We've also got a few spare tickets if anyone's interested (they're really a few).
Send an email to pedro@robosavvy.com in case you're interested in getting one (they'll be given out in a First Come, First served basis).</strike>
[EDIT]We've given out all of the tickets for the show.
Still, you're all welcome to come and visit us. We'll be happy to receive you![/EDIT]
We look forward to seeing you at GSL.
Regards
Pedro.


![]() by PedroR
by PedroR
Fri Apr 13, 2012 4:38 pm
Hi all
To highlight and further explain the challenges 8and accomplishments) for this project, I am posting some details on 2 of the key features we've developed: adapting a 3D Scan of Jason Bradburry's head and Build the Light box where the Robot dances.
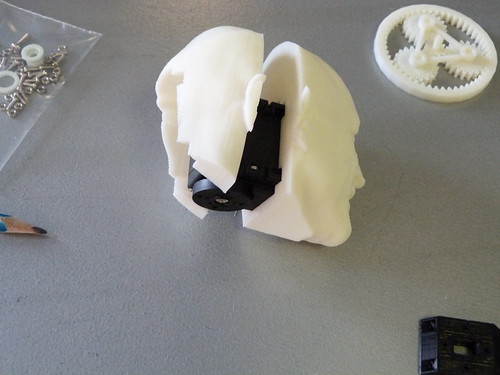
P1010928 by RoboSavvy, on Flickr
3D printed head of one of the presenters. The model was trimmed down from 1m polygons to 100k using Meshlab. then it was cut in half for ease fo 3D printing and the shape of the servo removed from within.
We got the 3D Scan from NorthOne TV and ran the simplification algorithm on Meshlab.
Once that was done, we moved to Sketchup:
We subtracted the 3D Shape of an AX12 Servo (to make room inside the had).
Finally we used a plane to divide the head in 2 halfs.
The head doesn't necessary need to be divide din half (if you join the 2 halfs it will still go in) but having it divided makes it a lot easier print (and you can print with much better quality).
The other key feature is the light box:
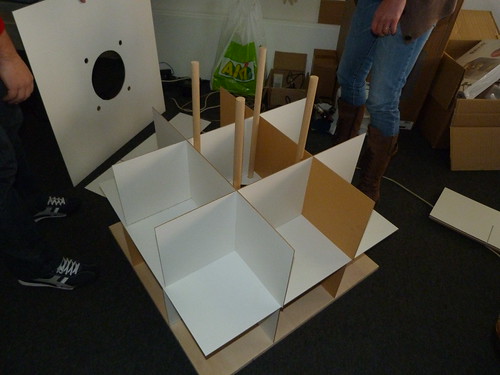
P1010855 by RoboSavvy, on Flickr
This is the inner structure which is covered by Acrylic (as you can see in the video).
Each cube is individually light by RGB LEDs and is controlled by 2 arduino boards.
Because the LEDs run from 12V we had to design special circuitry using transistors in order to convert the Arduino 5V PWM into 12V from a 3 cell LiPo.
The amount of work with the Transistors was tremendous as every cube required 3 channels (R, G, and B).
We don't have a picture of the circuitry but if the cube makes it back (fairly) intact we'll post some more pictures.
Regards
Pedro.
To highlight and further explain the challenges 8and accomplishments) for this project, I am posting some details on 2 of the key features we've developed: adapting a 3D Scan of Jason Bradburry's head and Build the Light box where the Robot dances.
P1010928 by RoboSavvy, on Flickr
3D printed head of one of the presenters. The model was trimmed down from 1m polygons to 100k using Meshlab. then it was cut in half for ease fo 3D printing and the shape of the servo removed from within.
We got the 3D Scan from NorthOne TV and ran the simplification algorithm on Meshlab.
Once that was done, we moved to Sketchup:
We subtracted the 3D Shape of an AX12 Servo (to make room inside the had).
Finally we used a plane to divide the head in 2 halfs.
The head doesn't necessary need to be divide din half (if you join the 2 halfs it will still go in) but having it divided makes it a lot easier print (and you can print with much better quality).
The other key feature is the light box:
P1010855 by RoboSavvy, on Flickr
This is the inner structure which is covered by Acrylic (as you can see in the video).
Each cube is individually light by RGB LEDs and is controlled by 2 arduino boards.
Because the LEDs run from 12V we had to design special circuitry using transistors in order to convert the Arduino 5V PWM into 12V from a 3 cell LiPo.
The amount of work with the Transistors was tremendous as every cube required 3 channels (R, G, and B).
We don't have a picture of the circuitry but if the cube makes it back (fairly) intact we'll post some more pictures.
Regards
Pedro.
![]() by PedroR
by PedroR
Fri Apr 13, 2012 6:00 pm
Hey guys
Here is some more footage.
This one is HD and you can really see the Robot and the whole interaction that's going on around it.
I'm also uploading a second video which I hope to post later.
Pedro.
and this one
http://youtu.be/kLvweKACu9M
Here is some more footage.
This one is HD and you can really see the Robot and the whole interaction that's going on around it.
phpBB [media]
I'm also uploading a second video which I hope to post later.
Pedro.
and this one
http://youtu.be/kLvweKACu9M
![]() by limor
by limor
Tue Oct 02, 2012 8:17 pm
And here he is again this time at the WPP Stream event . It danced in front of live audience and won the "best gadget award" and I'm supposed to get a Windows8 phone courtesy of Microsoft. Should received it end October once they formally release it.
http://www.youtube.com/watch?v=TBmffcfwYaw
http://www.youtube.com/watch?v=TBmffcfwYaw