HAR1 - AKA "Ender
HAR1 - AKA "Ender
![]() by Enderwiggins
by Enderwiggins
Thu Aug 02, 2012 3:56 pm
Been working on this in some form for a while now. College and life have been eating into my time lately so I was happy to have a little time to work on it.
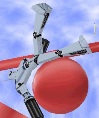
Ender is comprised of 12 HSR5990TG, 6 HS-485HB, and a HS-422 for the head. The servos are all powered off batteries and a BEC from Hobby king (5990TGs are run direct from the battery). Servos are controlled by a SSC-32 which is in turn controlled by a BotBoarduino which is controlled through an XBEE and programmed with an AVRISP MKII so I don't have to disconnect the XBEE. All of the frame elements are SES except for the board carrier which I machined from Acrylic.
I still need to do:
1. Install an on off switch
2. Mount the batteries
3. Secure wires better
4. Remove more compliance from joints by adding layers of scotch tape to fill gaps.
5. Machine new Board mounts from Aluminum with a hole for the programmer. (The acrylic has cracked already.)
6. Add some springs to preload certain joints
7. Find someone in/near Gainesville, Florida to battle!
8. Reintegrate IMU
Pictures:


![]() by Enderwiggins
by Enderwiggins
Fri Aug 03, 2012 3:05 pm
The majority of the robot is pieced together with parts from lynxmotion, brackets and electronics are both from them. I've been developing my own control board and brackets for awhile now but money is short and unfortunately I don't have the funds to have them milled. This whole robot came around one day when I realized that I've been redesigning a non-existent robot for years while watching everyone else play with their bots. I had 99% of the parts for this guy on hand so I threw him together to play with until I graduate and actually have money again.
The control board I'm designing should support 24 RC servos, 16 ADC, 16 GPIO, 3 serial, and a Xbee port. The board is 1.5" wide by 2" long by 1.5" tall (with xbee installed). It will be based off an xmega128A micro.
I might change the xbee port to a bluetooth module and I'll probably revamp it to support Dynamixel servos before I get it made up though.
The wire bundles need to be reworked, I kinda like how they look too but they're liable to get tangled in things.
I'm doing 1-5 on the list of things I posted and hope to have it walking by Monday. I'm not sure if I will rig up the gyros/accel before or after I've got it moving around (probably after since I don't want to redesign and just wanna play with it lol).
The electronics are not just xbee > servo control the top board is basically an Arduino so there's room to add autonomous actions to it. My first biped did blob tracking and obstacle avoidance to chase my quadrapod around and some stability stuff with the IMU. I'll probably re-implement the IMU at some point but other stuff is still up in the air since I want this robot to be able to take a beating.
![]() by ostro_goto
by ostro_goto
Fri Aug 03, 2012 6:31 pm
Hi Enderwiggins , congratulations! I like your robot, and see people who continue to create custom biped robot! I wait to see it move in a video!
------------------------------------------------------------------------------------------
YouTube http://www.youtube.com/user/ostrogoto0101
Blog http://ostrogoto0101.blogspot.it/
Mechitalia Forum http://www.mechitalia.altervista.org/forum/
------------------------------------------------------------------------------------------
YouTube http://www.youtube.com/user/ostrogoto0101
Blog http://ostrogoto0101.blogspot.it/
Mechitalia Forum http://www.mechitalia.altervista.org/forum/