<?xml version="1.0" encoding="UTF-8"?>
<feed xmlns="http://www.w3.org/2005/Atom" xml:lang="en-gb">
<link rel="self" type="application/atom+xml" href="http://forum.robosavvy.com/feed.php?f=15&amp;t=14171" />

<title>RoboSavvy Forum</title>
<subtitle>Robosavvy Forum: The largest online community of Humanoid Robot Builders</subtitle>
<link href="http://forum.robosavvy.com/index.php" />
<updated>2016-03-06T12:11:15+01:00</updated>

<author><name><![CDATA[RoboSavvy Forum]]></name></author>
<id>http://forum.robosavvy.com/feed.php?f=15&amp;t=14171</id>
<entry>
<author><name><![CDATA[l3v3rz]]></name></author>
<updated>2016-03-06T12:11:15+01:00</updated>
<published>2016-03-06T12:11:15+01:00</published>
<id>http://forum.robosavvy.com/viewtopic.php?t=14171&amp;p=43690#p43690</id>
<link href="http://forum.robosavvy.com/viewtopic.php?t=14171&amp;p=43690#p43690"/>
<title type="html"><![CDATA[Re: Raspberry Pi Powered robobuilder]]></title>

<content type="html" xml:base="http://forum.robosavvy.com/viewtopic.php?t=14171&amp;p=43690#p43690"><![CDATA[
Hi,<br />It will work with servos, as the head on my robot uses the little servos that RQ-HUNO uses. In terms of schematics, connect the serial I/O on the Raspberry to the RX/TX lines on the servos. There's plenty of web pages to explain how.<br /><br />I think the Huno may be too small though to carry the weight of the RPi - May be look at using the Pi-zero?  I now have a Raspberry Pi 3 and I'm printing a custom 3D case to sit on back of the 5710. This should be a powerful combination.<br /><br />cheers<p>Statistics: Posted by <a href="http://forum.robosavvy.com/memberlist.php?mode=viewprofile&amp;u=1101">l3v3rz</a> — Sun Mar 06, 2016 12:11 pm</p><hr />
]]></content>
</entry>
<entry>
<author><name><![CDATA[pbsk8]]></name></author>
<updated>2016-02-27T17:10:57+01:00</updated>
<published>2016-02-27T17:10:57+01:00</published>
<id>http://forum.robosavvy.com/viewtopic.php?t=14171&amp;p=43686#p43686</id>
<link href="http://forum.robosavvy.com/viewtopic.php?t=14171&amp;p=43686#p43686"/>
<title type="html"><![CDATA[Re: Raspberry Pi Powered robobuilder]]></title>

<content type="html" xml:base="http://forum.robosavvy.com/viewtopic.php?t=14171&amp;p=43686#p43686"><![CDATA[
Hi,<br /><br />I have a RQ-HUNO and do you think I could connect a raspberry pi to it as well? <br /><br />Would you have the schematics to do so? I didnt do anything to it anymore since I thought it is not that powerful with its own board, very limited and with only korean documentation available.<p>Statistics: Posted by <a href="http://forum.robosavvy.com/memberlist.php?mode=viewprofile&amp;u=7831">pbsk8</a> — Sat Feb 27, 2016 5:10 pm</p><hr />
]]></content>
</entry>
<entry>
<author><name><![CDATA[l3v3rz]]></name></author>
<updated>2015-08-03T11:42:46+01:00</updated>
<published>2015-08-03T11:42:46+01:00</published>
<id>http://forum.robosavvy.com/viewtopic.php?t=14171&amp;p=43584#p43584</id>
<link href="http://forum.robosavvy.com/viewtopic.php?t=14171&amp;p=43584#p43584"/>
<title type="html"><![CDATA[Re: Raspberry Pi Powered robobuilder]]></title>

<content type="html" xml:base="http://forum.robosavvy.com/viewtopic.php?t=14171&amp;p=43584#p43584"><![CDATA[
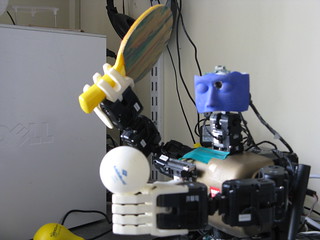
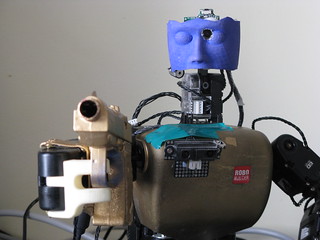
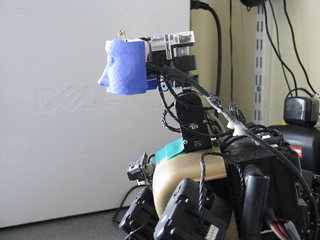
Here's a few photos with the webcam and face added !  It uses the new Sam-3 servos for 2dof head. and a 3D printed face. (actually the body in these photos is still the Omnima based one)<br /><br /><a href="https://flic.kr/p/wR4vvL" class="postlink"><img src="https://farm1.staticflickr.com/357/20245895962_7338713608_n.jpg" alt="Image" /></a><a href="https://flic.kr/p/wR4vvL" class="postlink">IMG_0007</a> by <a href="https://www.flickr.com/photos/69754688@N00/" class="postlink">phil leveridge</a>, on Flickr<br /><br />Anyone for tennis!?<br /><a href="https://flic.kr/p/wR4uFu" class="postlink"><img src="https://farm1.staticflickr.com/459/20245893162_dc3a20611f_n.jpg" alt="Image" /></a><a href="https://flic.kr/p/wR4uFu" class="postlink">IMG_0012</a> by <a href="https://www.flickr.com/photos/69754688@N00/" class="postlink">phil leveridge</a>, on Flickr<br /><br />The bot with the golden gun ?<br /><a href="https://flic.kr/p/wRRiQc" class="postlink"><img src="https://farm1.staticflickr.com/280/20254831815_b7e7a4cfa9_n.jpg" alt="Image" /></a><a href="https://flic.kr/p/wRRiQc" class="postlink">IMG_0016</a> by <a href="https://www.flickr.com/photos/69754688@N00/" class="postlink">phil leveridge</a>, on Flickr<p>Statistics: Posted by <a href="http://forum.robosavvy.com/memberlist.php?mode=viewprofile&amp;u=1101">l3v3rz</a> — Mon Aug 03, 2015 11:42 am</p><hr />
]]></content>
</entry>
<entry>
<author><name><![CDATA[l3v3rz]]></name></author>
<updated>2015-08-03T11:02:33+01:00</updated>
<published>2015-08-03T11:02:33+01:00</published>
<id>http://forum.robosavvy.com/viewtopic.php?t=14171&amp;p=43583#p43583</id>
<link href="http://forum.robosavvy.com/viewtopic.php?t=14171&amp;p=43583#p43583"/>
<title type="html"><![CDATA[Re: Raspberry Pi Powered robobuilder]]></title>

<content type="html" xml:base="http://forum.robosavvy.com/viewtopic.php?t=14171&amp;p=43583#p43583"><![CDATA[
Hi,<br />All the components can be easily found with google. I got most of mine from Farnell<br />The sockets for the wck leads is <!-- m --><a class="postlink" href="http://uk.farnell.com/te-connectivity-amp/292161-4/header-vertical-4way/dp/1282952">http://uk.farnell.com/te-connectivity-a ... dp/1282952</a><!-- m --><br />The breakout board I used was <!-- m --><a class="postlink" href="https://www.abelectronics.co.uk/products/15/breakout-boards/">https://www.abelectronics.co.uk/product ... ut-boards/</a><!-- m --> but there's a huge choice and I'm no expert. <br />The voltage level shifter is from robosavvy <!-- m --><a class="postlink" href="http://robosavvy.com/store/sparkfun-sparkfun-logic-level-converter-bi-directional.html">http://robosavvy.com/store/sparkfun-spa ... ional.html</a><!-- m --> this is needed as wck uses TTL and Rpi GPIO runs at 3.3V.<br /><br />The amount of resources available in websites, books, clubs make RPi such a good choice. I'm currently putting the schematic into DesignSpark CAD program so will publish that when its done - but might be a few weeks (at least)<br /><br />What to do with the extra power? Well I have connected a webcam up and that worked immediately out of the box and have mjpeg streamer running so I can process video images. So current projects I'm think off are:<br />1. Build a football playing robot, i.e. find a ball, track it, walk to it and kick it. (sounds simple doesn't it?)<br />2. Track a ping pong ball and see if I can get it to swing arm and hit it.  ( This might be easier as robot can be stationary.)<p>Statistics: Posted by <a href="http://forum.robosavvy.com/memberlist.php?mode=viewprofile&amp;u=1101">l3v3rz</a> — Mon Aug 03, 2015 11:02 am</p><hr />
]]></content>
</entry>
<entry>
<author><name><![CDATA[vmatos]]></name></author>
<updated>2015-08-03T09:53:50+01:00</updated>
<published>2015-08-03T09:53:50+01:00</published>
<id>http://forum.robosavvy.com/viewtopic.php?t=14171&amp;p=43582#p43582</id>
<link href="http://forum.robosavvy.com/viewtopic.php?t=14171&amp;p=43582#p43582"/>
<title type="html"><![CDATA[Re: Raspberry Pi Powered robobuilder]]></title>

<content type="html" xml:base="http://forum.robosavvy.com/viewtopic.php?t=14171&amp;p=43582#p43582"><![CDATA[
Excellent work!<br />Would share instructions and references in the near future?<br /><br />What are your goals with so much processing power?<p>Statistics: Posted by <a href="http://forum.robosavvy.com/memberlist.php?mode=viewprofile&amp;u=7820">vmatos</a> — Mon Aug 03, 2015 9:53 am</p><hr />
]]></content>
</entry>
<entry>
<author><name><![CDATA[l3v3rz]]></name></author>
<updated>2015-07-31T19:07:57+01:00</updated>
<published>2015-07-31T19:07:57+01:00</published>
<id>http://forum.robosavvy.com/viewtopic.php?t=14171&amp;p=43579#p43579</id>
<link href="http://forum.robosavvy.com/viewtopic.php?t=14171&amp;p=43579#p43579"/>
<title type="html"><![CDATA[Raspberry Pi Powered robobuilder]]></title>

<content type="html" xml:base="http://forum.robosavvy.com/viewtopic.php?t=14171&amp;p=43579#p43579"><![CDATA[
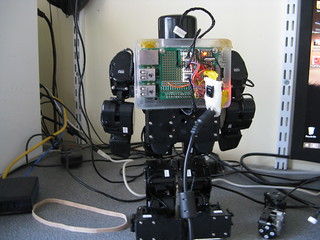
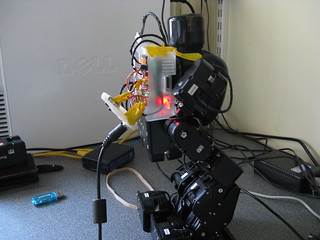
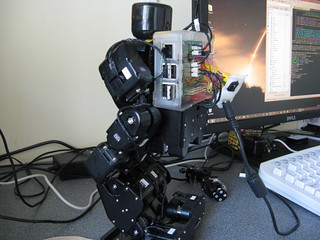
Summer project - connecting Raspberry Pi to Robobuilder.  Uses an expansion board to access UART and a level shift for voltages. Also RPi is powered through GPIO from a  7805 fed from the same power supply that drives servos.<br /><br />Cost is very cheap. RPi - £30, case £5, Breakout board £3.75, level shift 1.50, + wck sockets (few pence each) + odds<br /><br />Setting up the nanoBT usb to allow remote access is proving hard, so using Ethernet cable.  Next steps are to look at connecting accelerometer via I2C and may be the distance sensor  as well as custom 3D printed case.<br /><br />So much more powerful than the RBC box ! I have it running my Basic to control the robot (just a simple recompile) so it can walk etc, but RPi comes with Python as well Wolfram etc all built in so may look at a wck library for that. <br /><br />Rpi  has to be the way to go I think!. <br /><br />Here are some pictures.  <br /><a href="https://flic.kr/p/wshiYr" class="postlink"><img src="https://farm1.staticflickr.com/325/19988114189_bf9619bf30_n.jpg" alt="Image" /></a><a href="https://flic.kr/p/wshiYr" class="postlink">IMG_0003</a> by <a href="https://www.flickr.com/photos/69754688@N00/" class="postlink">phil leveridge</a>, on Flickr<br /><a href="https://flic.kr/p/vMKGn9" class="postlink"><img src="https://farm1.staticflickr.com/437/19552114194_0e63bbd05e_n.jpg" alt="Image" /></a><a href="https://flic.kr/p/vMKGn9" class="postlink">IMG_0004</a> by <a href="https://www.flickr.com/photos/69754688@N00/" class="postlink">phil leveridge</a>, on Flickr<br /><a href="https://flic.kr/p/vMKFJW" class="postlink"><img src="https://farm1.staticflickr.com/408/19552112094_15ea8ecdec_n.jpg" alt="Image" /></a><a href="https://flic.kr/p/vMKFJW" class="postlink">IMG_0005</a> by <a href="https://www.flickr.com/photos/69754688@N00/" class="postlink">phil leveridge</a>, on Flickr<p>Statistics: Posted by <a href="http://forum.robosavvy.com/memberlist.php?mode=viewprofile&amp;u=1101">l3v3rz</a> — Fri Jul 31, 2015 7:07 pm</p><hr />
]]></content>
</entry>
</feed>