From the experiments we've been doing in our lab and also ongoing projects there is a growing awareness of the importance and advantages of combining 3d printed parts with mechanical parts (bearings, shafts, motors, etc).
If you look on thingiverse, it's populated with nice things that you print and that's it but what's really amazing is what happens you start combining the parts with other mechanisms.
We would like to use this thread as a starting point to aggregate all these interesting resources.
Project 1: Makerbot's Wind up walkers and the cool Remote Controlled car
We'll start with a cool project and work our way to the more intricate ones.
Makerbot has some nice projects up for sale on their store that are great examples:
You 3D print the shell and only purchase the electronics and/or mechanics for a nice DIY project.
This is the Botmobile:
The interesting part here is that you download and print the 3D files.
If you don't like the design you can change it, imporove it and make it into a Tank for example.
More projects from Makerbot here http://store.makerbot.com/projects.html
Project 2: Thin Section Bearings: Robot Arm and Concentric Joints
The Robot arm is probably our flagship project in terms of combining mechanics with 3d printed parts.

Using a Thin Section Bearing to connect 3d Printed Parts by RoboSavvy, on Flickr
The design uses a Thin Section bearing to articulate two 3d printed parts that should rotate, controlled by an AX actuator.
In addition to allowing motion the bearing has an important role in providing stable and accurate rotation which key for the Robot arm.
There are a few key things to note:
- Bearings are usually employed to articulate 2 metal parts and therefore are usually much thicker
- Because we're dealing with lighter parts (plastic parts), thin scetion bearings are ideal. While they don't hold as much force, we're also using a material that is less resistant than metal so they should be a great match.
We sourced these from Bearingboys: http://www.bearingboys.co.uk/Thin_Section-1130-c
The other cool project that uses a similar approach is a concentric articulation/stand:

3d Printed parts and Mechanicals: thin section bearing by RoboSavvy, on Flickr

P1020422 by RoboSavvy, on Flickr
In this case we've also printed some teeth on the outside that will be actuated by a DC motor.
We've also printed the gear that fits the DC motor and matches the one on the Rotating Mechanism (don't have pictures though).
Project 3: 3D Printing a Gear reduction box
3D Printing can also be used to do the opposite. print mechanical parts as well.
In this case a gear reduction box to use with a stepper that had ~2º per step.
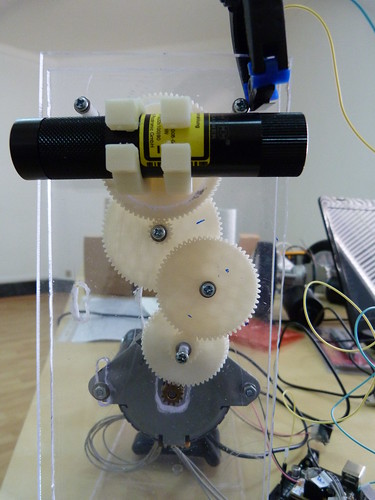
P1020390 by RoboSavvy, on Flickr
We needed to get smooth movement out of the stepper and the 4 stage reduction gave us just that.
The gears were designed using a very cool Sketchup plug in that automatically creates gears base don radius and number of teeth.
The plug in can be downloaded http://capolight.wordpress.com/2011/01/ ... -sketchup/
The original post can be found here http://robosavvy.com/forum/viewtopic.php?t=7979
We hope to post some more projects and please do share yours as well 
Regards
Pedro
PS: All 3D Printed parts were built with a Makerbot ReplicatorStatistics: Posted by PedroR — Wed May 30, 2012 11:32 am
]]>
