Hip Pivot Kit Pictures and Details
Hip Pivot Kit Pictures and Details
![]() by PedroR
by PedroR
Tue Apr 28, 2009 1:19 pm
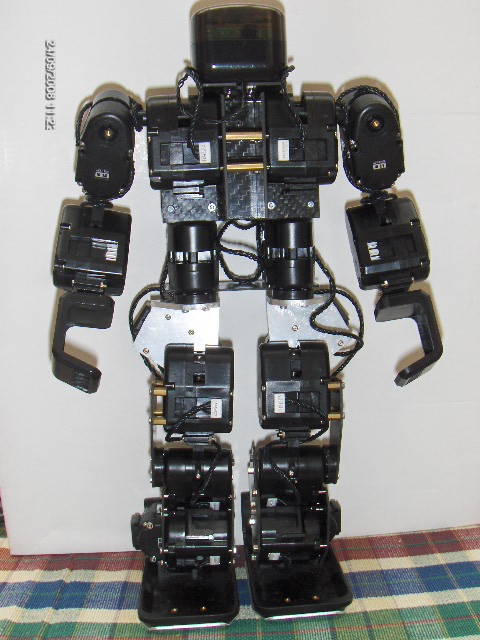
Here are some preliminary pictures for the hip pivot kit.
The brackets solution used is a bit different from the one showed in the manual.
Here the servos are placed at ~45deg in an approach that seems similar to iBot's choice. (iBot's pictures here http://robosavvy.com/Builders/i-Bot/Rob ... %20007.jpg and here http://robosavvy.com/Builders/i-Bot/Rob ... %20012.jpg).
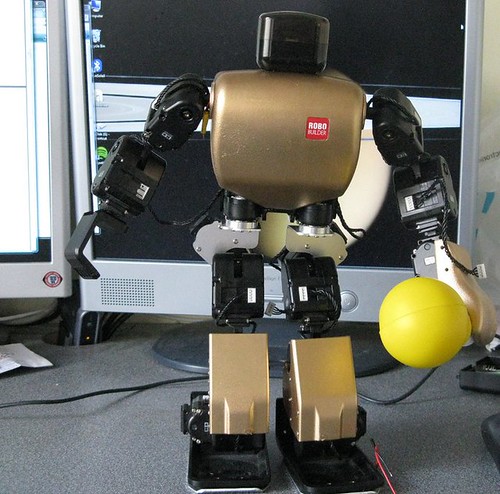
Anyway here are the pics from Robobuilder. These pics show a highly modded Robobuilder (it's probably one of their prototypes ... ) but the focus is here is the assembly of the hip kit.
Hip Brackets:


Assembled Robot:
In this example the robot also has the metal brackets kit.
However the Hip is compatible / can be assembled on any Robobuilder, even if they don't have the metal brackets kit


Robobuilder also recommends the use of a metal joint to assembled the Hip Kit. These are the pics of the metal joint:

In terms of servos Robobuilder recommendation is the use of wCK 1111.
We will most likelly stock the "Hip Pivot + Metal Joint + wCK 1111 servos" as a pack.
The motion files for an 18 DOF Robobuilder are scheduled to be Released by Robobuilder in the week of May 11th.

![]() by PedroR
by PedroR
Wed May 13, 2009 12:08 pm
I haven't heard from them with regards to the motion files but they need to be sent to us before we ship the kits.
As you know they unexpectedly delayed the delivery of the order meaning everything else got delayed
With regards to the metal joints, I must say the manufacturer won't be sending the joints separately but together (in a pack) with the metal brackets for the hip.
I know you already have your great-looking carbon fibre hip brackets but you would still need to purchase the complete kit of "hip brackets+metal joints" in order to get the metal joints.
I hope it's ok with you. A first batch of Hip Brackets will be coming with the remaining order of LiPo, metal gears, etc.
I'll be adding the hip kits to the store today.
Cheers
Pedro.
![]() by PedroR
by PedroR
Wed May 13, 2009 5:58 pm
The Hip Pivot Kit is now available in store:
http://robosavvy.com/store/product_info ... cts_id/537 - brackets and mtl joint #12 only
http://robosavvy.com/store/product_info ... cts_id/538 - full kit with brackets, metal joint & 2 wck 1111 servos with FULL METAL gears.
I believe this second represents a good value for money considering that for you get Full Metal Gears Servos.
As some of you may already know, Robobuilder delayed the shipment of our order as they were not expecting such a high demand. This means items are expected to ship on the week of June 1st.
We apologize for this delay but we were also caught off guard as this is the first time this manufacturer has delayed the delivery.
Regards
Pedro.
![]() by i-Bot
by i-Bot
Tue Jun 02, 2009 4:11 pm
I don't know what files Robobuilder will make available for 18DOF and 20DOF versions. Files are difficult to convert between numbers of DOF because motionbuilder errors out in trying to save rbm files after changing number of servos. When I did the 16 to 18, I rentered all of the moves. Now the rbm file format is known, I have a utilty which modifies rbm files and used this for 18 to 20. I also need this because I'm not using metal brackets which have 8 sets of holes on the servo joint, and the plastic only have 4. So having the thigh servos at 45 degrees needs a change to all those servo positions. The pentagonal shaft cannnot do this. My utility to modify the files is rather sad C#, but I can share if anyone has similar problems.
![]() by l3v3rz
by l3v3rz
Fri Jun 05, 2009 9:41 pm
cheers
![]() by i-Bot
by i-Bot
Sat Jun 06, 2009 4:27 am
The instructions here:
http://robosavvy.com/RoboSavvyPages/Rob ... _20DOF.pdf
seem similar to my arrangement.
I reassigned the two servos 0 and 1 as 16 and 17 respectively. and the two new servos are now 0 and 1 and installed below 16 and 17 respectively. This is based on the idea that the load on the hip rotate servos will be less than the hip side to side.
It is still difficult to judge which servos are the most critical for metal or high torque. I have all high torque in the legs except the last ankle, though that may be mistake now I have gyros fitted, because the ankles seem to be working quite hard.
Your gripper would be 18 and 19.
![]() by l3v3rz
by l3v3rz
Sun Jun 07, 2009 7:27 pm
http://farm3.static.flickr.com/2439/3605351158_33c53ca3ff.jpg?v=0
Now all I need is some motion files. Have you got yours walking yet ?
cheers
PedroR: how do you get the embedded images?]
![]() by PedroR
by PedroR
Mon Jun 08, 2009 6:48 pm
I have posted update instructions here http://robosavvy.com/RoboSavvyPages/Rob ... _20DOF.pdf
Specifically in page 2 there is now a chart with servo IDs.
There are other improvements that we have requested.
With regards to the motions, despite having insisted over and over again, I was unable to get a complete set of motion files form Robobuilder.
I was, however, able to get some random motions, which you can get here: http://robosavvy.com/RoboSavvyPages/Rob ... F_HUNO.zip
and more here
http://robosavvy.com/RoboSavvyPages/Rob ... _files.zip
According to Robobuilder,
"For 18 DOF, you remove 2 wCK [use Config menu] and match the wCK ID positions in the MotionBuilder. "
To compile previous information and form what I understand, to set up the Robot with > 16 DOF, you'll need to use MotionBuilder in "Creator Other" mode and put the RBC into Custom Platform mode.
![]() by dlc
by dlc
Tue May 24, 2011 7:15 pm
PedroR wrote:Hi
I have posted update instructions here http://robosavvy.com/RoboSavvyPages/Rob ... _20DOF.pdf
Specifically in page 2 there is now a chart with servo IDs.
There are other improvements that we have requested.
With regards to the motions, despite having insisted over and over again, I was unable to get a complete set of motion files form Robobuilder.
I was, however, able to get some random motions, which you can get here: http://robosavvy.com/RoboSavvyPages/Rob ... F_HUNO.zip
and more here
http://robosavvy.com/RoboSavvyPages/Rob ... _files.zip
According to Robobuilder,
"For 18 DOF, you remove 2 wCK [use Config menu] and match the wCK ID positions in the MotionBuilder. "
To compile previous information and form what I understand, to set up the Robot with > 16 DOF, you'll need to use MotionBuilder in "Creator Other" mode and put the RBC into Custom Platform mode.
Has anyone yet gotten working 18 DOF files for use with the default IR remote? I've installed these, but now have a robot that I can't use. Creating one from scratch is a heavy lift!
Thanks,
DLC

![]() by PedroR
by PedroR
Wed May 25, 2011 9:36 am
To use more than 16 DoF you can't use the default Robobuilder motion files. (ie the blue buttons on the top of the remote).
You need to put the Robot in Custom Platform mode and program your motions files manually.
The motions will be available on buttons 0-9 (plus a combination of *+0-9 totaling 20 possible recorded motions)
You will need to recreate your motions or alternativelly start with the default motions and add two servos.
I remeber i-Bot posted a tool here on the forum that was capable of modifying existing MTN files to add extra servos.
If you need it I can look around and post some more resources about thsi here.
Another possibility is using an alternative firmware (the ones by l3v3rz). He's done some excellent job and their firmwares support some extra servos (such as grippers).
Regards
Pedro.
![]() by dlc
by dlc
Wed May 25, 2011 5:37 pm
PedroR wrote:Hi dlc
To use more than 16 DoF you can't use the default Robobuilder motion files. (ie the blue buttons on the top of the remote).
You need to put the Robot in Custom Platform mode and program your motions files manually.
The motions will be available on buttons 0-9 (plus a combination of *+0-9 totaling 20 possible recorded motions)
You will need to recreate your motions or alternativelly start with the default motions and add two servos.
I remeber i-Bot posted a tool here on the forum that was capable of modifying existing MTN files to add extra servos.
If you need it I can look around and post some more resources about thsi here.
Another possibility is using an alternative firmware (the ones by l3v3rz). He's done some excellent job and their firmwares support some extra servos (such as grippers).
Regards
Pedro.
Thanks Pedro!
I'd appreciate any help that is available to get me off the ground with this! I didn't realize that by added the extra DOF for the hips I'd be totally leaving behind everything from the original! Even being able to use the remote. I have not looked just yet, but what are the most popular replacements for the IR remote? Obviously it can't be used in any competition where IR is totally unreliable. I have a few options here in the lab, but I'm wondering what everyone else uses in Sumo One type competitions or others!
It looks time to break out the manuals and get ready for some heavy lifting!
Thanks all,
DLC
![]() by PedroR
by PedroR
Thu May 26, 2011 10:31 am
I will try to explain thsi the best I can. i have not worked with extended Robobuilders hand-on myself but have collected a lot of information to share here on the forum.
So here we go:
1) To get your 18DoF model working you first need to put your HUNO in Custom Platform mode. (see the users manual).
2) Next Reprogram the servo IDs on the 2 extra servos to be 16 and 17. Instructions on how to do that are here: http://robosavvy.com/RoboSavvyPages/Rob ... nglish.pdf
3) Open Motion builder
Click New and Choose Platform. CREATOR OTHER
4) Next you need to connect the COMM cable between the PC and the Robot, turn on the Robot and Open the COMM port. Motionbuilder needs to be connected to the Robot in order to work.
5) Click CONFIG
- Add the servos numbers you have (you'd have 0 to 17 I believe: 0-15 are the base ones and then 16 and 17 are the extra ones. You would have configured their ID in point 2)
6) Next Download the motion files available here and extract them to your HDD http://robosavvy.com/RoboSavvyPages/Rob ... Motion.zip
7) in motion Builder, click Motion List and Click Import
Select the various RBM files you extracted in point 5 that are in the folder Creator HUNO and import one by one.
Once everything is complete and ready, use the Robobuilder Download Tool to download your Edited Motion files to the Robot.
Again, make sure the Robot/RBC controller is set in CREATOR OTHER mode (and not Huno). The downloaded motion files can be commanded using buttons 0-9 on the Remote.
I hope this is a good starting point. From here you'd have to develop on your own.
One final note: you may also want to look into using alternative firmwares, A list of them is available on the Wiki http://robosavvy.com/site/index.php?opt ... obobuilder
Also look around here on the forum as there are also other versions of firmwares with different features, mostly developed by forum member l3v3rz.
Regards
Pedro.
walk whit Hip Pivot Kit
![]() by nicolas gomez
by nicolas gomez
Wed Jun 01, 2011 2:54 pm