The OpenServo
![]() by Robo1
by Robo1
Tue Jan 16, 2007 6:46 pm
DerekZahn - what servo do you use that could pull more then 3A!
RobotJay two question:
One could you post a proper picture of you robot (the on in you author image). with some detail looks good.
second, are the two wire send e.g. position, recieve e.g. current, position, force.
How much for one open servo board with the parts already attached, shakey hand soldering
If I did buy this what sort of docs is there I've looked at the site and there is some but a dummy guide would be good for the communication protocol. I'm a good high level programmer but low level communication isn't my strong point but at I'm trying to learn.
you guy keep the good work going over at open servo hopefully I can start to contribute once I have a demo going and get a little bit more stuck in.
bren

![]() by DerekZahn
by DerekZahn
Tue Jan 16, 2007 7:20 pm
Robo1 wrote:DerekZahn - what servo do you use that could pull more then 3A!
The HSR-5995TG has a stall current of 5.2A at 7.4v. If I were to try to build my own someday for Bing 4 (an idea that sounds kind of fun) I'd try for even higher power... although using a higher voltage motor would be better than increasing the current.
![]() by RobotJay
by RobotJay
Tue Jan 16, 2007 10:18 pm
First of all, to Derek: Holy crap. I never realized that the HSR-5995's drew so much current. I bet batteries get drained SUPER fast at that rate. Either way, it would be a simple matter to drop in a higher rated MOSFET.
To Bren,
I'll start a new thread in the "homebrew" section with pics of my very first Robo-1 attempt. Hope you and the community enjoy.
DO NOT try to assemble an OpenServo by hand, unless you have God-like hand stability and the patience of 5 saints combined. All the components are surface mount and they are TINY. I personally cannot even solder the largest components by hand. I had to buy a lot of fairly expensive equipment just to be able to produce these. I am selling completed boards for $20/piece. E-mail me at j.ragsdale@pendragonrobotics.com if you want to order some. I offer discounts if you buy 16 at a time (enough for a 16 DOF biped,) but I suggest buying just one or two to play with and learn with before buying enough to fill out a whole biped.
Here's a quick peek at what the 4 wires are for:
1---> SDA (see explaination below)
2---> Battery (+)
3---> GND (-)
4---> SCL
These are the necessary wires for low-level I2C programming. Basically, SDA is how the information is sent in and out of the servo, and SCL is just a series of +5v clock pulses that all the servos use to synchronize with each other.
Unfortunately, there is no clear, easy, documented way to communicate with the OpenServo. Currently, the best method is to use the U2C-12 bridge from Diolan.
It is possible to use a BASIC Stamp 2 to communicate with the OpenServos, although it is not as easy as using the bridge from Diolan. Also, there is no documentation at the OpenServo website to specifically do it. The BASIC Stamp 2p series of stamp have built in I2C capabilities, but again, you would have to play with it for a while, and read a whole lot of datasheets to get it to work. You should start a thread in the OpenServo forums about using stamps to control the OpenServo, and we can possibly write the necessary documentation together.
I am currently working on an I2C bridge that that uses a wireless BlueTooth conection from Sparkfun. (i'm sure you can find other people around the community using the same set-up... its so easy to work with.) This is still a work in progress, and probably won't be finished until early March. When I finish that, I plan to fully support it with documentation and software.
I will admit that the OpenServo website is fairly hard to navigate at first, because it's so hard to know where to start. The forums have much greater amounts of info than the main site, so make sure you are reading through those as well. I suggest posting in the forums with ANY questions you happen to have. The admins are nice, and there is no such thing as a dumb question. Chances are, if you're asking it on the boards, then there are about 50 lurkers who are asking the same thing to themselves. Hope this answers all your questions. Talk to you soon.
-Jay
![]() by billyzelsnack
by billyzelsnack
Wed Jan 17, 2007 8:27 am
What's the biggest FET that could be put on it without changing the design?
How much would you want for one? I bought a bunch of motor+gearboxes that were for paper shredders. The motor is a pretty large guy. I think it is this motor..
http://www.johnsonelectric.com/product/ ... odID=75--A
I did a rough calculation and it would have 8248 oz/in of torque! Should be about the same speed as a normal servo too at 50rpm.
Here's the blog entry I did on it awhile ago.. http://www.z425.com/robot/diy-servo-project/
Anyway.. I guess what would be the largest you could go and how much? btw. I don't really care about the footprint too much.
EDIT: haha.. I just looked at the stall current on that motor. 91 amps!
![]() by RobotJay
by RobotJay
Wed Jan 17, 2007 3:37 pm
Without creating a new, custom design, the largest drop-in replacement I can find is here. This FET is only rated at 9A, which is MUCH lower than the 91A necessary for your gearmotors.
Sorry to say, but you will need a custom servo driver. Fortunately for you, the OpenServo can be fairly easily redesigned to give you what you need. E-mail me if you're interested in me redesigning a custom servo driver for you.
Sorry to say, but you will need a custom servo driver. Fortunately for you, the OpenServo can be fairly easily redesigned to give you what you need. E-mail me if you're interested in me redesigning a custom servo driver for you.

![]() by ginge
by ginge
Wed Jan 24, 2007 12:29 am
Hi all,
There are a few people in this thread that have noted no documentation for OpenServo, so I have attached a few links to the docs.
http://openservo.com/moin.cgi/TWIProtocol
http://openservo.com/moin.cgi/ServoDocumentation
http://openservo.com/moin.cgi/ServoFAQ
It would seem Basic Stamp code is what people want to see, I guess I had better order one.
Barry
![]() by ginge
by ginge
Tue Feb 13, 2007 12:56 pm
Just a quick update on the OpenServo project:-
We now have bezier curve motion profile functionality! The servo will carefully follow the defined curve along its path.
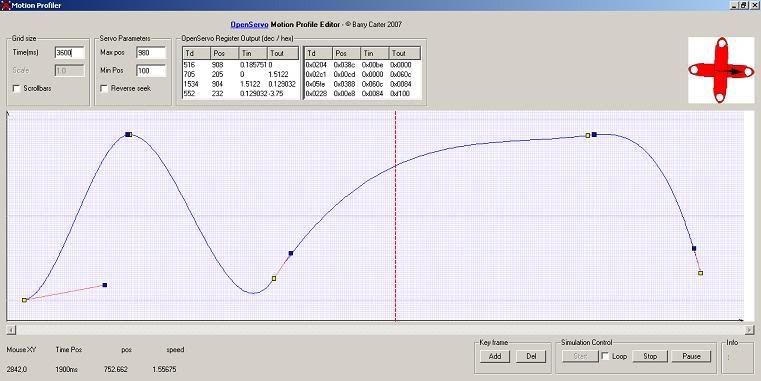
Details here.
http://openservo.com/moin.cgi/Utilities
In addition I have created a large amount of documentation for construction through to use of an OpenServo. Code Samples will be ready soon.
http://openservo.com/moin.cgi/StepByStep
Barry
We now have bezier curve motion profile functionality! The servo will carefully follow the defined curve along its path.
Details here.
http://openservo.com/moin.cgi/Utilities
In addition I have created a large amount of documentation for construction through to use of an OpenServo. Code Samples will be ready soon.
http://openservo.com/moin.cgi/StepByStep
Barry